
Suppliers
3-minute read · Last updated 3 November 2026
Add the businesses and people you buy from, with their TRN, currency and address, so you can record their bills and payments.
Before you start
- To see suppliers, your role must allow you to view suppliers. To add, edit or archive them, it must allow you to manage suppliers. The Owner, Admin and Accountant roles can do both.
- Have the supplier's name ready. If they are registered for VAT, have their 15-digit TRN as well.
- If you have many suppliers in another accounting platform, you can bring them in with a file instead. See Move your data from another accounting platform.
Steps
Add a supplier quickly
- Go to Purchases › Suppliers.
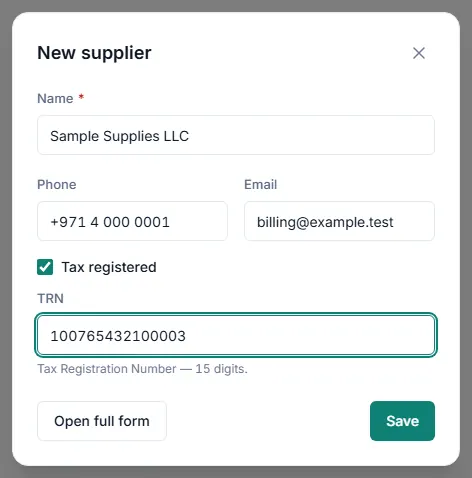
- Click New supplier. A small window opens.
- Type the supplier's Name.
- Add a Phone and Email if you have them.
- If the supplier is registered for VAT, tick Tax registered and type the TRN.
- Click Save. The supplier appears in the list.
Add a supplier with every detail
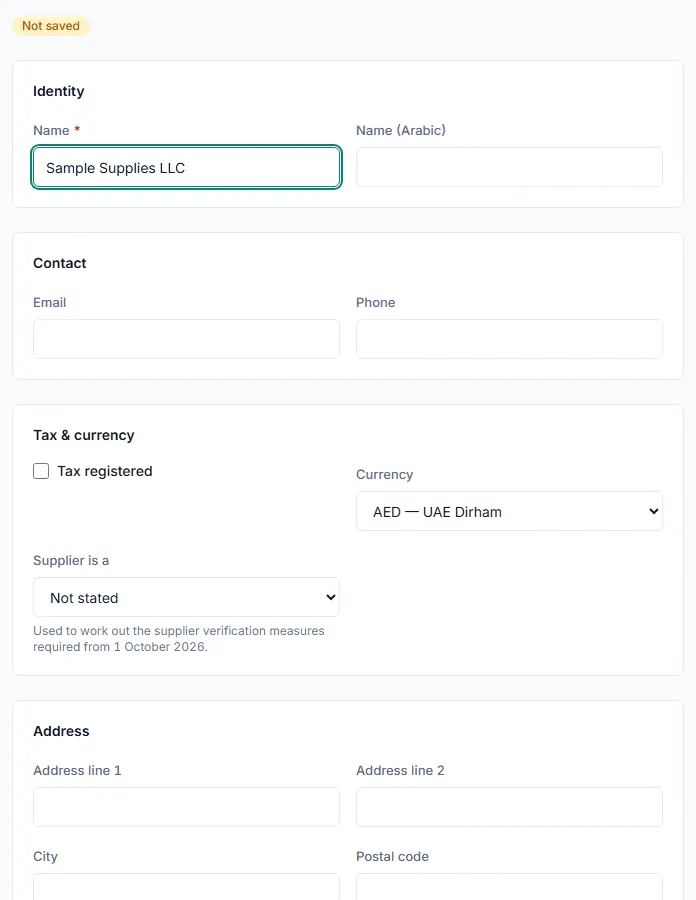
- In the New supplier window, click Open full form. What you have typed so far is carried over.
- Under Identity, check the Name and add Name (Arabic) if you use it.
- Under Contact, fill in Email and Phone.
- Under Tax & currency, tick Tax registered and enter the TRN if the supplier has one.
- Choose the Currency the supplier bills you in.
- In Supplier is a, choose Legal person (company) or Natural person (individual). Leave Not stated only if you do not know yet.
- Under Address, fill in Address line 1, City, Emirate and Country (ISO-2).
- Add any Notes.
- Click Create supplier.
Change, archive or open a supplier
- In the list, click Edit on the supplier's row to change their details, then click Save changes.
- Click Archive to set a supplier aside. Archived suppliers are hidden from the list. Tick Include archived to see them again, and click Restore to bring one back.
- Click the supplier's name to open their page. It shows the Verification history, the Verification evidence you have uploaded, and the risk checks for that supplier.
What happens next
- The supplier can now be chosen on a new bill. See Enter a supplier bill.
- The currency you set is used as the default currency when you pick this supplier on a bill.
- The Supplier is a choice decides which verification checks the supplier page asks for. Until it is set, the page asks you to set it before it shows a checklist.
- From the supplier's row you can also click Advance payment to record money paid before a bill arrives, and Apply credit to use that money against open bills later.
Common mistake
Typing a supplier's name into an expense is not the same as adding the supplier here. The Supplier (optional) box on an expense is plain text and does not link to this list. If you want a supplier's bills, payments and verification to sit together, add the supplier here and record their invoices as bills.
Related
Last updated: 3 November 2026